4. Data Ingestion
DeepIQ supports the ingestion of data from the following sources.
- Time series: WITSML 1.4, WTIMSL 1.3, OSI PI, Aspen Tech IP21, Historians/SCADA/PLC systems that support OPC HDA/OPC UA/MQTT (Examples include Honeywell PhD, GE Proficy, Cygnet)
- Geospatial Sources: Different types of Map formats and satellite imagery
In addition, DeepIQ supports read/write access to the following sources:
- Cloud Databases: AWS Databases (Redshift/Timestream), Snowflake, Delta Lake,
- File Systems: S3
- Streaming Sources: AWS Kinesis, Confluent Kafka, Azure Event Hub
- On-Premise Databases: All data sources that support JDBC/ODBC, Hive, HBase, MongoDB
5. Transformations
DeepIQ supports 250+ inbuilt transformations for extensive scale engineering of time-series, geospatial, and structured data sources.
6. Machine Learning
DeepIQ provides a no-code app to build machine learning pipelines spanning supervised/unsupervised/deep learning use cases. It also offers end-to-end machine learning features. Special-purpose pipeline features are provided to address challenges in time series and geospatial data sources.
DeepIQ has patent-pending algorithms that allow users to build knowledge models and use AI to optimize their performance.
The current DeepIQ customer base spans Upstream, Downstream, Midstream, Renewable, Financial, Mining, and Agricultural verticals. With DeepIQ, these Customers have built solutions for several high-value use cases, including:
- Equipment Predictive Health
- Production and Drilling Optimization
- Real-Time Operations Monitoring Mineral Prospectivity Analysis
- IT-OT convergence reports
- Quality Monitoring
- Carbon Emissions Monitoring
7. Deployment Options
The introductory material describes all deployment options discussed in the user guide, including single-AZ, multi-AZ, and multi-region deployments. These options provide flexibility and scalability to meet the diverse needs of different organizations.
Managed Service: This option involves installing the application on the customer’s infrastructure. It allows organizations to maintain control over their environment while leveraging the capabilities of DataStudio. The managed service deployment ensures that the application is tailored to the specific requirements and configurations of the customer’s existing infrastructure.
- SaaS Offering: The publisher hosts the applications on a dedicated infrastructure in this option. This Software-as-a-Service (SaaS) model provides a hassle-free deployment experience as the publisher manages the infrastructure, maintenance, and updates. Organizations can benefit from the scalability and reliability of the publisher’s infrastructure while focusing on their core business operations.
- Single-AZ Deployment: This deployment option involves setting up the application within a single Availability Zone (AZ). It suits organizations with lower availability requirements and can be a cost-effective solution for smaller-scale deployments.
- Multi-AZ Deployment: This option involves deploying the application across multiple Availability Zones within a single region. It enhances the availability and fault tolerance of the application by distributing resources across different AZs. Multi-AZ deployment is ideal for organizations that require higher availability and resilience.
- Multi-Region Deployment: This deployment option involves setting up the application across multiple regions. It provides the highest availability and disaster recovery capabilities by distributing resources across different geographic locations. Multi-region deployment is suitable for organizations with global operations and stringent availability requirements.
By offering these deployment options, DataStudio ensures that organizations can choose the most suitable configuration to meet their needs and operational requirements.
8. Deployment Timing
The expected time to complete the deployment is no more than 3 hours. This timeframe includes all necessary steps to ensure smooth and efficient deployment. The deployment process is designed to be straightforward and user-friendly, minimizing downtime and ensuring the application is up and running as quickly as possible.
The deployment process involves several key stages:
- Preparation: This stage includes gathering all necessary resources and prerequisites, such as the deployment kit, IAM user credentials, and access keys. It also involves setting up the Ubuntu VM and ensuring all required tooling is installed and configured correctly.
- Infrastructure Provisioning: During this stage, the necessary AWS resources are provisioned, including Databricks on AWS, EFS, EKS, IAM User, S3 Bucket, Secret Manager, VPC, Subnet, Virtual Machines, and ECR. This stage ensures that the infrastructure is ready to support the deployment of DataStudio.
- Product Installation: This stage involves running the installation scripts provided by DeepIQ. The scripts automate the installation process, configuring the application and setting up all required components. The installation process is designed to be efficient and error-free, with built-in checks and validations to ensure successful deployment.
- Validation and Testing: After the installation is complete, the deployment process includes validation and testing to ensure the application functions correctly. This stage involves running health checks and verifying the status of all components. Any issues identified during this stage are addressed promptly to ensure smooth deployment.
By following these stages, the deployment process is streamlined and efficient, ensuring that the application is deployed within the expected timeframe of 3 hours.
9. Supported Regions
All the resources needed for DataStudio can be deployed in any region, so all regions available on AWS are supported. This flexibility ensures that organizations can choose the most suitable region based on their specific requirements, such as proximity to their user base, compliance with regional regulations, and availability of AWS services. By supporting all AWS regions, DataStudio allows organizations to optimize their deployment for performance, cost, and redundancy.
When selecting a region for deployment, organizations should consider factors such as:
- Latency: Choosing a region geographically closer to most users can reduce latency and improve the overall user experience.
- Compliance: Some regions may have specific regulatory requirements that organizations must comply with. Deploying in a region meeting these requirements can help ensure local laws and regulations compliance.
- Service Availability: Different AWS regions may offer varying service availability and features. Organizations should select a region that provides the AWS services and features required for deployment.
- Cost: AWS pricing can vary between regions. Organizations should consider the cost implications of deploying in different regions and choose a region that aligns with their budget and cost optimization goals.
- Disaster Recovery: For organizations with stringent availability and disaster recovery requirements, deploying across multiple regions can provide additional redundancy and resilience. This approach ensures that the application remains operational even during a regional outage.
By supporting all AWS regions, DataStudio ensures that organizations can deploy their applications in the most suitable region to meet their specific needs and operational requirements.
10. Prerequisites & Requirements
10.1. Deployment Resources
We use an Ubuntu VM to provision the entire infrastructure and install the product. A script will install the necessary prerequisites and prepare the VM for product installation. The publisher provides a deployment kit at the time of installation.
When the deployment is complete, the following resources are set up on AWS:
- Databricks on AWS: This service is used for big data processing and analytics. It provides a unified analytics platform for data engineering, data science, and machine learning.
- EFS (Elastic File System): EFS provides scalable file storage with AWS Cloud services and on-premises resources. It is designed to be highly available and durable.
- EKS (Elastic Kubernetes Service): EKS is a managed Kubernetes service that makes it easy to run Kubernetes on AWS without installing and operating your own Kubernetes control plane or nodes.
- IAM User: An IAM user is created with the necessary permissions to manage the resources required for the deployment.
- S3 Bucket: S3 is used for object storage, providing a scalable and secure location to store data.
- Secret Manager: AWS Secrets Manager helps protect access to applications, services, and IT resources without the upfront cost and complexity of managing your hardware security module (HSM) infrastructure.
- VPC (Virtual Private Cloud): A VPC is created to provide a logically isolated section of the AWS Cloud where you can launch AWS resources in a defined virtual network.
- Subnet: Subnets are created within the VPC to segment the network and control traffic flow.
- Virtual Machines: Virtual machines are provisioned to run the various components of the DataStudio application.
- ECR (Elastic Container Registry): ECR is a fully managed Docker container registry that makes storing, managing, and deploying Docker container images easy.
These resources are essential for the deployment and operation of DataStudio, ensuring that the application is set up in a secure, scalable, and efficient manner.
10.1.1. Technical Prerequisites and Requirements
Several technical prerequisites and requirements must be met to ensure a smooth and successful deployment of DataStudio. These prerequisites cover permissions, software, skills, and environment configuration.
Permissions and IAM Users:
IAM users should have permission to allocate the resources required by deployment. DeepIQ’s scripts provided as part of the AWS marketplace will initiate and manage deploying all the necessary resources.
Consumers should be permitted to create an IAM role with authorization to provide the abovementioned resources.
AWS CLI:
The AWS Command Line Interface (CLI) must be installed and configured on the machine used for deployment.
Operating System and Software:
The deployment requires an Ubuntu 20.04 or above machine with at least 8GB of free storage.
Skills and Specialized Knowledge:
The user installing DataStudio needs to be familiar with AWS, specifically creating resources in AWS and adding the required permissions to the user’s IAM profile.
The user installing DataStudio needs to have an administrator account or an account with sufficient privileges and should be familiar with setting up a service account with enough privileges to create the resources required by DataStudio.
Environment Configuration:
Customers must manage the domain on which the product should be hosted through Route 53 to finish the installation successfully.
The installation script provided by the publisher adds an “A” record to the Route53 zone supplied at the installation time.
Organizations can facilitate a smooth and efficient deployment process for DataStudio by ensuring that these technical prerequisites and requirements are met.
10.1.2. OS and Software
Ubuntu 20.04 or above machine with at least 8GB of free storage.
10.2. Skills and Specialized Knowledge
Several skills and specialized knowledge are required to ensure smooth and successful deployment of DataStudio. These prerequisites cover familiarity with AWS, permissions, and account management.
AWS Familiarity:
- The user installing DataStudio needs to be familiar with AWS, specifically creating resources in AWS and adding the required permissions to the user’s IAM profile. This includes navigating the AWS Management Console, using the AWS CLI, and managing AWS services such as EC2, S3, and IAM.
Administrator Account:
- The user installing DataStudio needs to have an administrator account or an account with sufficient privileges. This account should have the necessary permissions to create and manage AWS resources, including IAM roles, policies, and access keys. The user should be familiar with setting up a service account with enough privileges to create the resources required by DataStudio.
Service Account Setup:
- The user should be familiar with setting up a service account with enough privileges to create the resources required by DataStudio. This involves creating IAM roles and policies, configuring access keys, and ensuring the service account has the necessary permissions to manage the deployment process.
Technical Expertise:
- The user should have technical expertise in managing and configuring cloud infrastructure. This includes understanding network configurations, security groups, VPCs, subnets, and other AWS resources. The user should be able to troubleshoot and resolve issues related to the deployment process.
Knowledge of Deployment Scripts:
- The user should be familiar with running deployment scripts and configuring YAML files. This includes understanding how to use the deployment kit provided by DeepIQ, configuring the necessary secrets and access keys, and running the installation scripts to deploy DataStudio.
10.3. Environment Configuration
To ensure the successful deployment of DataStudio, it is essential to configure the environment properly. This includes managing the domain, setting up the necessary network configurations, and ensuring all required components are in place.
Domain Management:
- Customers must manage the domain on which the product should be hosted through Route 53 to finish the installation successfully. This involves creating and configuring the necessary DNS records to point to the appropriate resources.
- The installation script provided by the publisher adds an “A” record to the Route 53 zone supplied at the installation time. This ensures the domain is correctly configured to route traffic to the DataStudio application.
Network Configuration:
- VPC (Virtual Private Cloud): An isolated VPC will be created without connection with existing VPCs on the customer end. The VPC would have two subnets: Public and Private.
- Subnets: Subnets are created within the VPC to segment the network and control traffic flow. All resources are spawned on the private subnet, while the Application Load Balancer is made in the public subnet to accept traffic coming over the Internet.
- Security Groups: Security groups are configured to control inbound and outbound traffic to the resources within the VPC. This ensures that only authorized traffic is allowed to access the DataStudio application.
- NACLs (Network Access Control Lists): NACLs provide an additional layer of security by controlling traffic at the subnet level. This helps to protect the resources within the VPC from unauthorized access.
- Route Tables: Route tables are configured to define the routes for traffic within the VPC. This ensures traffic is correctly routed between the subnets and the Internet.
Instance Metadata Service Version 1 (IMDSv1):
- All components of the solution hosted in the customer’s account support the ability for the customer to disable Instance Metadata Service Version 1 (IMDSv1). If your product calls to AWS APIs, you should ensure you are using the latest version of the AWS SDK. Current SDK versions will use IMDSv2 automatically to ensure your product meets this requirement.
11. Architecture Diagrams
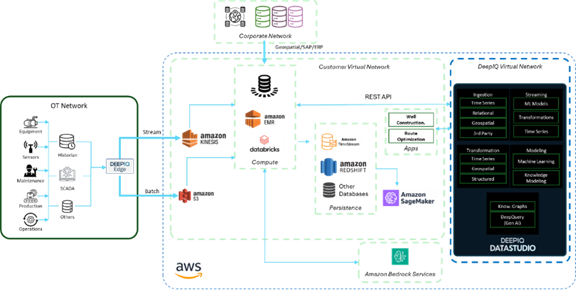
11.1. Logical and Deployment Diagram
The following diagram illustrates a standard deployment of DeepIQ’s DataStudio on AWS. DeepIQ DataStudio can connect directly to data sources like relational databases in the corporate customer network by leveraging AWS-Corporate Network connectivity. Networks with Industrial Control Systems may be in secure zones where Pull requests from external sources are not allowed. DeepIQ provides edge software for these networks that uses a Push Protocol to send data to the customer account on AWS.
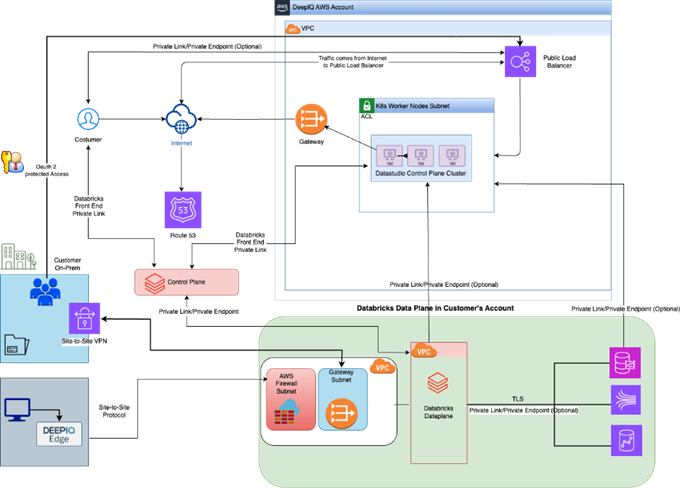
11.2. Network Diagram
The following diagram illustrates the standard network architecture diagram for DeepIQ DataStudio installed in a customer tenant.
12. Security
12.1. Resources
- DataStudio does not require root or Administrator privileges. DeepIQ adheres to the AWS policies and procedures outlined here: https://docs.aws.amazon.com/IAM/latest/UserGuide/id_root-user.html.
- DeepIQ adheres to the AWS policy of least privilege for all access granted as part of the deployment, as outlined here. https://docs.aws.amazon.com/IAM/latest/UserGuide/best-practices.html
- The deployment process involves creating an IAM user with particular roles. The roles limit access to only creating resources we require and ensure that our tooling does not use more access than it needs.
- The DataStudio deployment process does not include any public resources
12.2. IAM Roles and Policies
The IAM roles and policies necessary to provision DataStudio are mentioned below.
- Full access to EKS is needed to create and manage an EKS cluster.
- Full access to S3 to create S3 buckets and manage related permissions.
- Full access to routes is required to search if the domain the client has provided is present in their route; also, once the domain is found, we need to add A records for installation.
DeepIQ adheres to the policies outlined here: https://docs.aws.amazon.com/IAM/latest/UserGuide/best-practices.html.
12.3. Sensitive Information
All the keys a customer creates should be stored in the AWS secret manager, which is used during deployment. The following keys are used at the time of deployment.
- IAM user secret Keys
- Databricks Personal Access Token
- S3 bucket keys
DeepIQ adheres to the policies outlined here: https://docs.aws.amazon.com/secretsmanager/latest/userguide/best-practices.html.
12.4. Data Encryption
DataStudio will be leveraging Server-side encryption. AWS S3 automatically encrypts data before storing it and decrypts it when retrieved. This ensures that all data stored in S3 is protected and secure.
For deployments involving more than a single element, it is essential to include network configuration to ensure secure communication between components. The necessary network configurations include:
- VPC (Virtual Private Cloud): An isolated VPC will be created without connection with existing VPCs on the customer end. The VPC would have two subnets: Public and Private.
- Subnets: Subnets are created within the VPC to segment the network and control traffic flow. All resources are spawned on the private subnet, while the Application Load Balancer is made in the public subnet to accept traffic coming over the Internet.
- Security Groups: Security groups are configured to control inbound and outbound traffic to the resources within the VPC. This ensures that only authorized traffic is allowed to access the DataStudio application.
- NACLs (Network Access Control Lists): NACLs provide an additional layer of security by controlling traffic at the subnet level. This helps to protect the resources within the VPC from unauthorized access.
- Route Tables: Route tables are configured to define the routes for traffic within the VPC. This ensures traffic is correctly routed between the subnets and the Internet.
DeepIQ adheres to the data encryption policies as outlined here: https://docs.aws.amazon.com/vpc/latest/userguide/what-is-amazon-vpc.html.
12.5. Network Configuration
To ensure secure communication between components, it is essential to include network configuration in the deployment guide. The necessary network configurations include:
- VPC (Virtual Private Cloud): An isolated VPC will be created without connection with existing VPCs on the customer end. The VPC would have two subnets: Public and Private.
- Subnets: Subnets are created within the VPC to segment the network and control traffic flow. All resources are spawned on the private subnet, while the Application Load Balancer is made in the public subnet to accept traffic coming over the Internet.
- Security Groups: Security groups are configured to control inbound and outbound traffic to the resources within the VPC. This ensures that only authorized traffic is allowed to access the DataStudio application.
- NACLs (Network Access Control Lists): NACLs provide an additional layer of security by controlling traffic at the subnet level. This helps to protect the resources within the VPC from unauthorized access.
- Route Tables: Route tables are configured to define the routes for traffic within the VPC. This ensures that traffic is correctly routed between the subnets and the Internet.
DeepIQ follows the AWS practices outlined here:
https://docs.aws.amazon.com/AmazonS3/latest/userguide/security-best-practices.html
https://docs.aws.amazon.com/vpc/latest/userguide/what-is-amazon-vpc.html
https://docs.aws.amazon.com/vpc/latest/userguide/configure-subnets.html
https://docs.aws.amazon.com/vpc/latest/userguide/VPC_SecurityGroups.html
https://docs.aws.amazon.com/vpc/latest/userguide/vpc-network-acls.html
https://docs.aws.amazon.com/vpc/latest/userguide/VPC_Route_Tables.html
12.6. Instance Metadata Service Version 1 (IMDSv1)
All components of the solution hosted in the customer’s account support the ability for the customer to disable Instance Metadata Service Version 1 (IMDSv1). If your product calls to AWS APIs, you should ensure you are using the latest version of the AWS SDK. Current SDK versions will use IMDSv2 automatically to ensure your product meets this requirement.
DeepIQ adheres to the AWS policy: https://docs.aws.amazon.com/AWSEC2/latest/UserGuide/configuring-instance-metadata-options.html.
12.7. Customer Data
DeepIQ does not store sensitive customer data. However, customer data is managed and stored in various locations depending on the type of data and its usage within the DataStudio application.
- S3 Buckets: Customer data is stored in Amazon S3 buckets, which provide scalable and secure object storage. This includes data ingested from various sources and data generated by the application.
- Relational Databases: Some state information is stored in relational databases deployed by the tool. These databases are periodically backed up and stored in S3.
- Secrets Manager: All keys created by the customer should be stored in the AWS Secrets Manager, which is used during deployment. The following keys are used at the time of deployment:
- IAM user secret keys
- Databricks Personal Access Token
- S3 bucket keys 2.
DeepIQ adheres to the AWS policy on sensitive data if required: https://docs.aws.amazon.com/prescriptive-guidance/latest/defining-bucket-names-data-lakes/handling-sensitive-data.html.
13. Costs
13.1. Billable Services
Billable services and guidance on whether each service is mandatory/optional.
DataStudio utilizes the following billable services
- Databricks on AWS – billing depends on cluster usage
- EKS – resources on EKS are used for running the DataStudio application
- S3 – S3 is used as the primary data store for ETL
- VPC
- Virtual Machines
- ECR
- Privatelink (optional) – these are optional and can be added on by the user through DataStudio UI after the core application is installed
13.2. Cost and Licensing models
Customers have the flexibility to choose from various features and contract lengths available on our AWS Marketplace page https://aws.amazon.com/marketplace/pp/prodview-pw3vfhglc3nq2
To purchase custom installations, or for more information or assistance, please contact us at info@deepiq.com.
DataStudio Base License (Bronze) includes.
| Call |
Each Additional Node (per Node) | Call |
Each Additional Edge Connector (per Connector) | Call |
Each Additional Five Concurrent Users | Call |
DataStudio Silver License includes 40 hours per month of data science and big data management-related support for DataStudio-based solutions. | Call |
DataStudio Gold License includes 80 hours per month of data science and big data management-related support for DataStudio-based solutions. | Call |
DataStudio Platinum License includes 168 hours per month of data science and big data management-related support for DataStudio-based solutions. | Call |
*Details are in DeepIQ‘s Software License Agreement
14. Sizing
14.1. Sizing Guidelines
DeepIQ provides scripts for installation with instructions. There are two major sections in the installation guide.
- Infrastructure provisioning on customer tenants and
- Product installation
15. Deployment Assets
15.1 Workload Deployment
Step-by-step instructions for deploying the workload on AWS per typical deployment architecture.
- Login to the Ubuntu VM, which was provisioned in the prerequisite section
- Ensure AWS CLI is working
Install the required tooling
curl -sL https://aka.ms/InstallAzureCLIDeb | sudo bash
sudo apt update
sudo apt install -y python3.8-venv
wget https://github.com/ahmetb/kubectx/releases/download/v0.9.4/kubectx
sudo mv kubectx /bin/kubectx Nav
sudo chmod +x /bin/kubectx
wget https://github.com/ahmetb/kubectx/releases/download/v0.9.4/kubens
sudo mv kubens /bin/kubens
sudo chmod +x /bin/kubens
curl -LO “https://dl.k8s.io/release/$(curl -L -s https://dl.k8s.io/release/stable.txt)/bin/Linux/amd64/kubectl”
sudo mv kubectl /bin/kubectl
sudo chmod +x /bin/kubectl
wget https://get.helm.sh/helm-v3.9.0-linux-amd64.tar.gz
tar -xzvf helm-v3.9.0-linux-amd64.tar.gz
sudo mv linux-amd64/helm /bin/helm
sudo chmod +x /bin/helm
rm -rf helm-v3.9.0-linux-amd64.tar.gz
rm -rf linux-amd64
wget https://github.com/roboll/helmfile/releases/download/v0.144.0/helmfile_linux_amd64
sudo mv helmfile_linux_amd64 /bin/helmfile
chmod +x /bin/helmfile
helm plugins install https://github.com/databus23/helm-diff
- Get the installation kit from DeepIQ
- Copy the kit to the home directory of the Ubuntu server you use for installation.
- Unzip kit “tar -xzvf deployment-kit.tar.gz”
- Navigate to the deployment-kit directory. Note that this directory will be used for the remaining installation process.
- Add all the required configs by taking the “input-aws.yaml.example” file and renaming it to “input-aws.yaml”
- Add all the required secrets
- Follow the instructions in the YAML file for more details
- In the “input-aws.yaml,” you’ll have to pass the access_key and secret_key of the iam-user you want to use for the installation. Before proceeding further, we recommend you go ahead and create a new user and attach the following “iam” policy to it.
{
“Version”: “2012-10-17”,
“Statement”: [
{
“Sid”: “Stmt1674741028752”,
“Action”: “eks:*”,
“Effect”: “Allow”,
“Resource”: “*”
},
{
“Sid”: “Stmt1674741077496”,
“Action”: “s3:*”,
“Effect”: “Allow”,
“Resource”: “*”
},
{
“Sid”: “Stmt1674741151370”,
“Action”: “route53:*”,
“Effect”: “Allow”,
“Resource”: “*”
}
]
}
- Once the new IAM-user is created, create the access_key and secret_key for this iam user and add it to the input-aws.yaml file.
- Run the main file “python main.py.”
15.2. Testing & Troubleshooting
15.2.1. Validation and Testing
- To validate the installation script, ensure the script should exit with the output “INSTALLATION SUCCESSFUL” if the execution went well.
- The script will run a set of checks and output the installation status in the console. It will point you to the failing cases, if any, and show you instructions on how to fix them.
15.2.2. Infrastructure Troubleshooting
- Check the status of worker nodes: Make sure all worker nodes are in the Ready state and are connected to the cluster.
- Check IAM permissions: Ensure that the required IAM permissions are in place for the nodes, control plane components, and other resources in the cluster.
- Check the status of the control plane components: Verify the status of the API server, controller manager, etcd; components of the control plane.
- Increase the log verbosity: If necessary, increase the log verbosity of the control plane components and worker nodes to provide more information for troubleshooting.
- Check the pod status: Check the status of pods in the cluster, especially for critical system components such as the kube-dns or kube-proxy pods.
15.2.3. Troubleshooting
- List the nodes: kubectl gets nodes
- Get Status of DataStudio components: kubectl gets component statuses
- Verify pod status: kubectl get pods –all-namespaces
- Get pod logs: kubectl logs <pod_name>
- Check the proxy health: kubectl proxy
15.3. Health Monitoring
15.3.1. AWS Services
- CloudWatch Logs: You can use AWS CloudWatch Logs to monitor the logs generated by various AWS services, including EC2 instances, containers, and custom applications.
- CloudWatch Alarms: You can create CloudWatch Alarms to monitor metric values and set triggers to receive notifications or automatically react to changes in the state of your resources.
- CloudTrail: You can use AWS CloudTrail to log, monitor, and retain events related to AWS API calls made in your account.
- The application comes with the following monitoring tools
- Prometheus
- ELK Stack
- Grafana Dashboard
DeepIQ adheres to the AWS policy outlined here:
https://docs.aws.amazon.com/health/latest/ug/monitoring-logging-health-events.html
15.3.2. Application Monitoring
Using Installation Scripts: Our installation package contains a script health check. sh. Users can run this script using bash health check. sh. The script checks for the health of all our installed components and generates a report. It also gives actionable steps to fix things in case a problem is spotted. If the user cannot resolve the issue, they can generate the report and send it to us to engage with one of our Engineers.
Using Health Check Endpoint: A health check endpoint is created once the application installation is complete. Users can visit that endpoint to see the health of various components. If everything’s good, all the components on this health check endpoint will be green. If not, the users can run the health check.sh script for advanced diagnostics and reach out to us for further support.
15.4. Backup and Recovery
The application is stateless. We store some states in S3 buckets and some in relational databases, which our tool deploys.
We periodically back up all our databases and store them on s3.
For recovery, we have a recovery script in the installation kit provided at the time of installation, which can help customers restore the state of all our databases to a previous state.
16. Maintenance
16.1. Routine Maintenance
16.1.1. Rotating Programmatic System Credentials and Cryptographic Keys
HTTPS: Currently, the application uses Let’s Encrypt to secure web APIs. The cert manager will automatically obtain an SSL/TLS certificate from Let’s Encrypt using the account information specified in the cluster-issued resource at the beginning of the installation. The manager will also renew the certificate automatically before it expires. For user-selected keys, it is the customer’s responsibility to upload the keys to the secret manager for the application to access them.
16.1.2. Software Updates
Software updates are shipped to clients using our installation kit. After every new release, we send our customers a new installation kit – which the customer can then run to upgrade existing infrastructure.
16.1.3. License Keys
Not applicable
16.1.4. Managing AWS Service Limits
Our application uses few resources and doesn’t hit any AWS Service Limits. However, the user needs to be mindful of the following.
16.1.5. VPC Limit
Installation might fail because there are too many VPCs in a region. AWS enforces a limit on the number of VPCs that you can spawn in a region. If you hit these limits during installation, our script will show you the relevant error and guide you on resolving it.
16.1.6. Compute Limit
Our application doesn’t use a lot of computing resources. We use 12-16 CPU cores, so you shouldn’t be hitting any AWS Limits with that.
16.2 Emergency Maintenance
16.2.1 Fault Conditions
- Network failures: Interruptions in network connectivity or slowdowns that can impact the deployment process. The application is configured with three retries for any network failures. This can be increased as needed.
- Resource constraints: For insufficient memory, CPU, or disk space that can cause the deployment to fail, the application throws necessary errors and instructions for fallback scripts.
- Configuration errors: Misconfigured settings, such as incorrect database credentials, are handled in the deployment scripts
- Dependency issues: Problems with required software or libraries, such as missing dependencies or conflicting versions, are baked into the Ubuntu image at pre-installation steps
16.2.2. Application Recovery
Return to the deployment instructions to recover the application and execute the main.py script. The product will be recovered to the previous state.
16.2.3. Infrastructure Recovery
- Retrieve the Terraform state file, which will be stored in the S3 file share.
- Run the “terraform init” command to initialize Terraform and download any necessary plugins.
- Run the “Terraform plan” command to see the changes Terraform would make to bring your infrastructure back to the state described in the Terraform state file.
- Run the “terraform apply” command to apply the changes Terraform has planned and recover your infrastructure.
- Verify that the infrastructure has been successfully recovered and is in the desired state.
Note: Before proceeding with the recovery, it is essential to back up the existing Terraform state file in case you need to roll back the changes.
17. Databricks Deployment
The Databricks deployment is designed to enhance scalability, security, and data management within the DeepIQ DataStudio platform. By leveraging Databricks’ managed clusters, users can efficiently process large and complex workflows, ensuring optimal performance and resource utilization.
- Scalability: Automatically scale Spark jobs with Databricks’ managed clusters, enabling efficient processing of large and complex DataStudio workflows.
- Security: Leverage enterprise-grade access controls, encrypted data transfers, and audit logging for secure job execution and compliance.
- Data: Enable direct access to Delta Lake with ACID guarantees, track data lineage, and manage schema evolution within integrated workflows.
17.1 Pre-requisites and setup instructions
- Create Service Account in Databricks
- Go to User Management → Service Principals (or Users if using a user-based account).
- Click Add Service Principal and note the Application ID (if applicable).
- Generate PAT Token
- Log in as the service account or impersonate it (if allowed).
- Go to User Settings → Access Tokens → Click Generate New Token.
- Set an expiration and copy the token (you won’t see it again).
- Configure in DataStudio
- In DataStudio, go to Connection Settings → Add Databricks Cluster.
- Enter the Databricks workspace URL and paste the PAT token for authentication.
- Save and test the connection.
17.2. Step-by-step guide to configure the integration.
- Navigate to the Databricks Clusters Page
- In DataStudio, go to the “Databricks” section.
- Click on “Clusters” to view and manage Databricks clusters.
- Enable and Configure a Workspace
- Enter your Workspace URL
- Provide a PAT Token (from Databricks user or service principal)
- Click Save/Connect
- Create a New Cluster
- On the Clusters page, click “Create Cluster”
- Fill in cluster configuration details similar to Databricks UI:
- Cluster Name
- Databricks Runtime Version (e.g., 13.3 LTS)
- Node Type (e.g., Standard_DS3_v2)
- Min/Max Workers (for autoscaling)
- Enable autoscaling if desired
- Click “Launch” or “Create”
This will provision the cluster in your linked Databricks workspace.
17.3. API References (Submitting a Workflow to the Cluster)
Request JSON we use to submit a job to Databricks Cluster
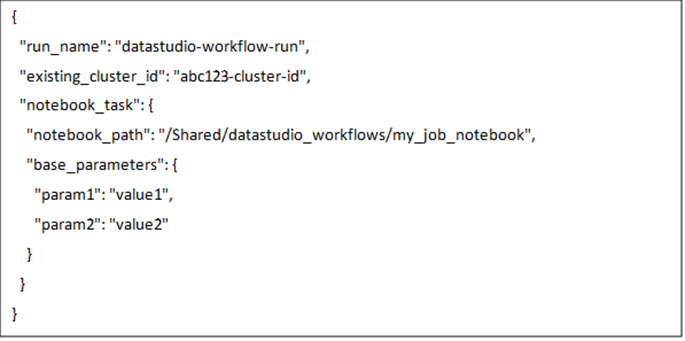
API Call Using curl

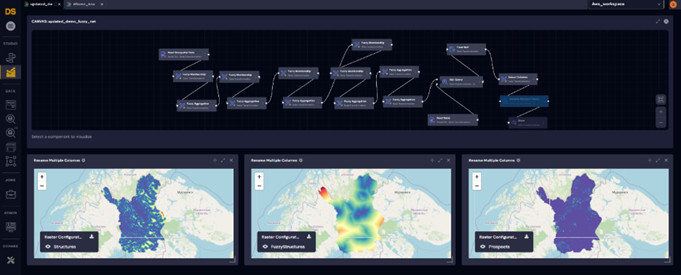
17.4. Sample Workflows in Databricks (DataStudio)
The following sample workflows demonstrate how to leverage Databricks within the DeepIQ DataStudio platform to process and analyze data efficiently.
18. Support
18.1. Getting Help
Users can get support by submitting a ticket to support@deepiq.com. The support available is outlined in the support tiers in this document.
18.2. Support Tiers
18.2.1. Technical Support Overview
Service Request tickets can be opened by phone, email, or on the DeepIQ website. Tickets will be handled through 3 levels of technical support, as outlined below. The troubleshooting of an issue reported to technical support is limited to DeepIQ products. It does not include troubleshooting the platforms that the DeepIQ products support, any big data platform, or any third-party software (collectively “Third Party Software and Hardware”).
DeepIQ offers technical support coverage each business day during regular business hours. Customers may contact live support by telephone or email. Customers can leave a voice mail or declare an emergency to get priority service if all agents are busy.
When the customer contacts Customer Support outside of coverage hours, the customer must leave a voice message or email to receive technical support on the next business day.
18.2.2. Levels of Support
Level 1: Level 1 Support is the first level of technical support for the end user and includes:
- First contact and direct end-user input.
- Clarification of functions and features of the product and documentation about the product.
- Search for posted technical notes, knowledge database, and other technical information supplied that will assist in providing problem resolutions.
- Error verification, analysis, and correction to the extent possible.
- Information collection and analysis.
- Identification of whether the problem is known and has a known solution.
- Troubleshooting and problem reproduction.
- Problem report administration and tracking.
- Severity classification and escalation of issues to Level 2 and Level 3 support.
- Distributing software upgrades, product enhancements, new releases, and appropriate documentation.
Level 2: Level 2 Support includes:
- Troubleshooting and resolution of issues through installation and configuration modifications.
- Implementation of a known workaround solution.
- Suppose the Level 2 representative finds a reproducible defect or cannot resolve a problem within the allotted Level 2 resolution time. In that case, the request will be escalated to Level 3 Support for resolution.
Level 3: Level 3 Support includes:
Additional software investigation and code review.
- In the case of software-related fixes, in addition to resolving the customer problem, DeepIQ may incorporate specific problem fixes into its next software maintenance release. A problem fix for Severity Level 1 or 2 issues may be issued as a patch release that may be incorporated in the next major release of the software/firmware.
- Documentation corrections into the next documentation revision.
18.2.3. Initial Response Times
P0 – Critical | Any issue that jeopardizes the essential operation of the Licensed Software may result in physical or other damage or data loss. | The initial response, including the estimated fix time, will be within one business day of written notice by email. Fix: ASAP. |
P1 – High | Any issue which may significantly limit the operation of the Licensed Software. | The initial response, including the estimated fix time, will be within one business day of written notice by email. Fix: ASAP after all open P0s. |
P2 – Medium | Issues that partially limit the operation of the Licensed Software or are otherwise less urgent. | The initial response, including the estimated fix time, will be within three business days of written notice by email. Fix: ASAP after all open P1s. |
P3 – Low | Minor issues. | The initial response, including the estimated fix time, should be within seven business days of written notice by email. |
P4 – Trivial | Trivial issues. | The initial response, including the estimated fix time, should be within seven business days of written notice by email. |